

This is part 3 of a 3-part series on building a full-stack blog app. To catch up, read part 1 and part 2 first. See the full source code that inspired it on Github.
If you've been following along, you have a full-stack blog app that renders content that is fetched from Butter CMS, served via Dart Frog, and supplied to a Flutter web app. What follows is a guide to hosting this app on AWS.
I will divide this part of the tutorial into two parts: one for deploying the API on AWS App Runner, and one for deploying the web app on AWS Amplify Hosting. If you wanted, you could deploy the entire app on App Runner, since it runs a container on the cloud. The benefit of separating hosting is that you don't have to re-deploy the API if you make minor changes that only affect the app, and Amplify hosting provides a very quick and easy way to host and update static web content (with a free first year of hosting as well!).
Deploying the API
There is a good tutorial on deploying Dart Frog to AWS App Runner in the official Dart Frog documentation. We are going to follow this tutorial, while also making some changes to generate deployments in our CI pipeline. The first thing we need to do is create the necessary Identity and Access Management (IAM) policies in AWS. We will need our App Runner app to be able to access Elastic Container Registry (ECR), Secrets Manager, and Github Actions.
Setting up IAM
ECR Access Role
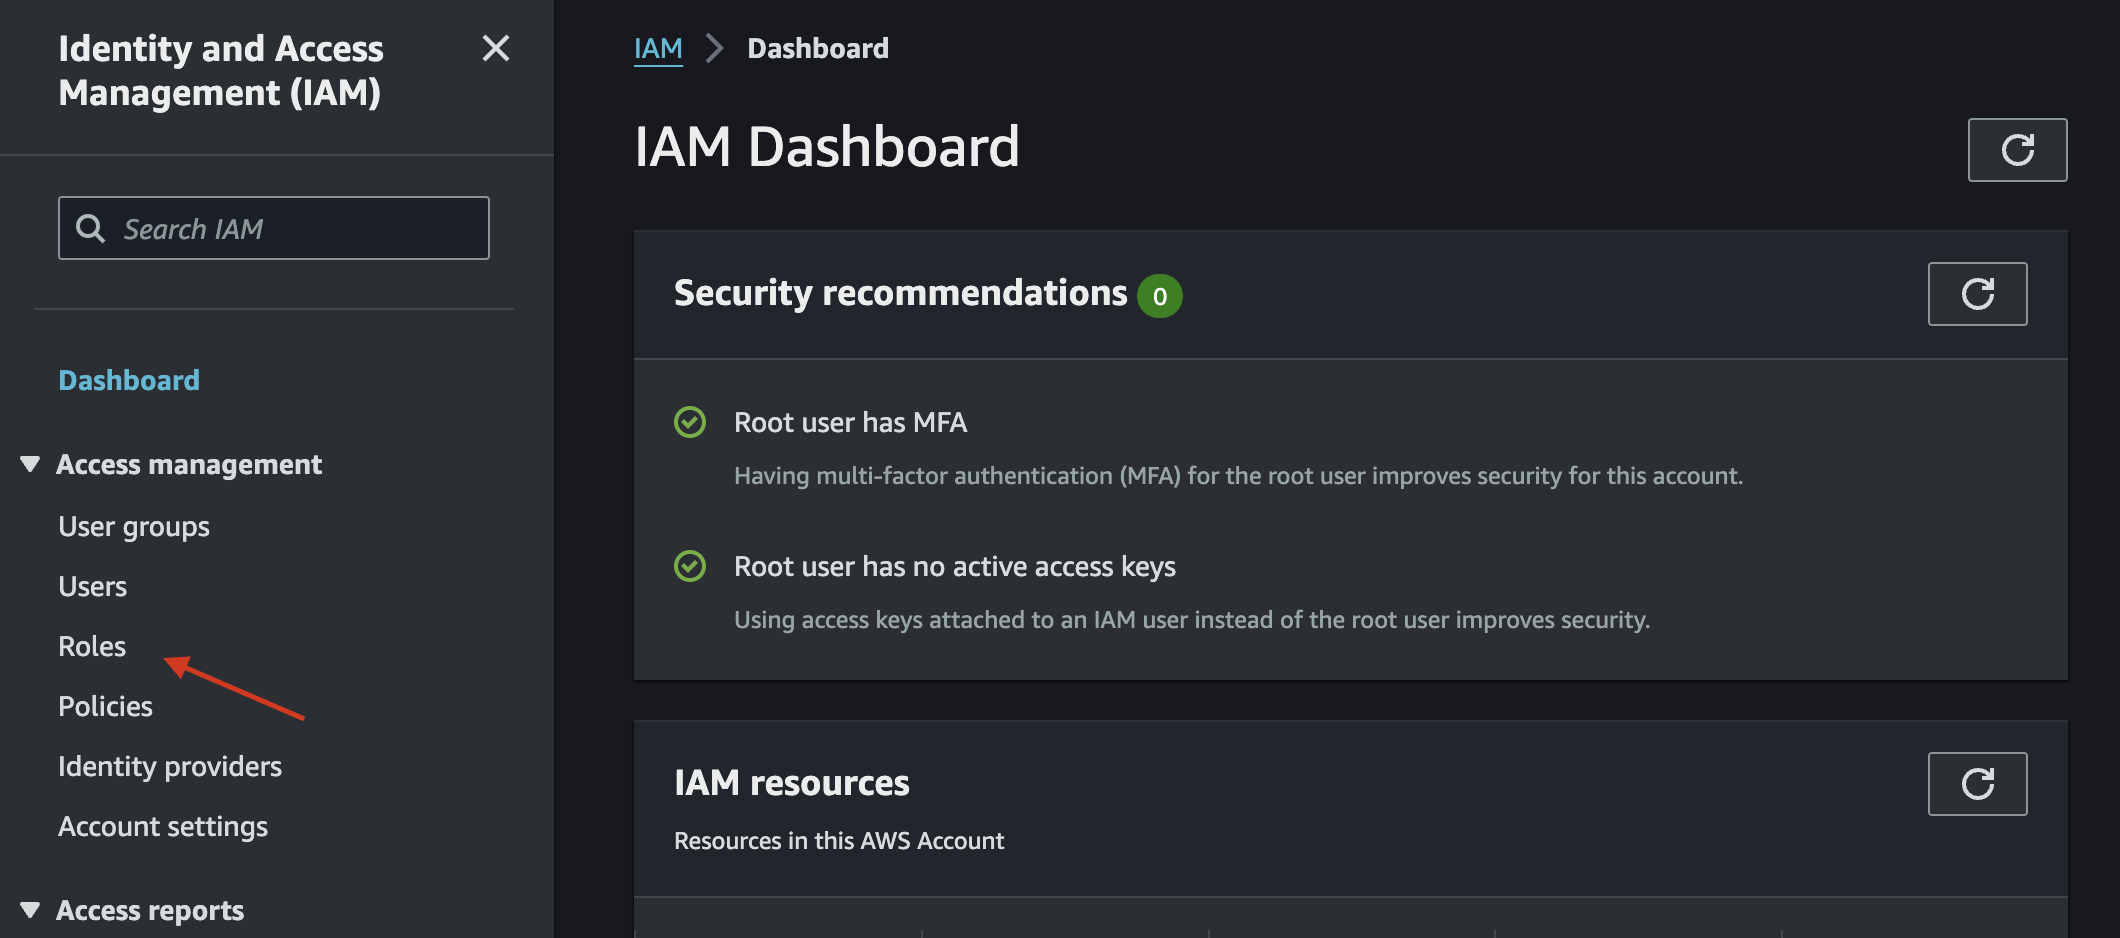
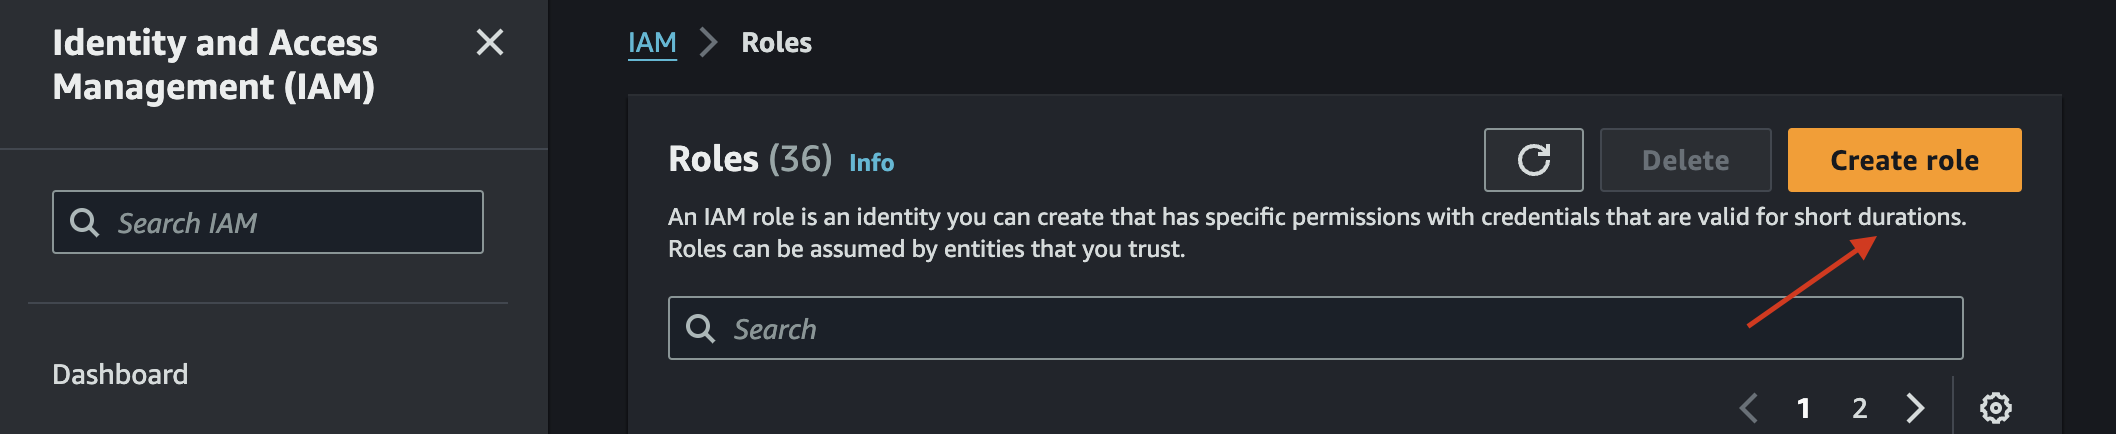
Sign into the AWS console and search for IAM. On the left hand side menu, select "Roles", and choose "Create Role."
Select "Custom Trust Policy" and enter the following JSON policy to allow entities who assume this role to access AWS App Runner:
{
"Version": "2012-10-17",
"Statement": [
{
"Effect": "Allow",
"Principal": {
"Service": "build.apprunner.amazonaws.com"
},
"Action": "sts:AssumeRole"
}
]
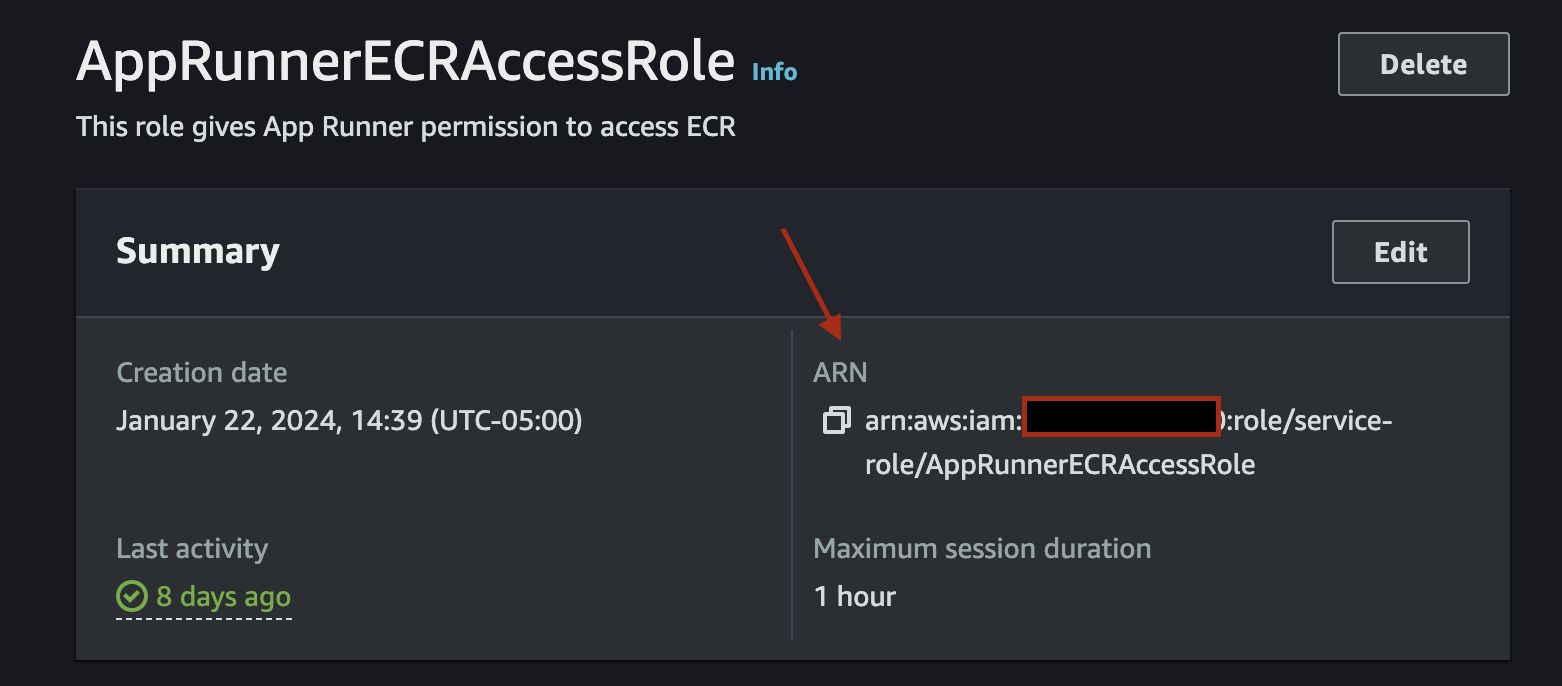
}Under create policies, search for AWSAppRunnerServicePolicyForECRAccess and add the policy to the role. Take note of the Role ARN, you will need this value later.
Github Actions User Access
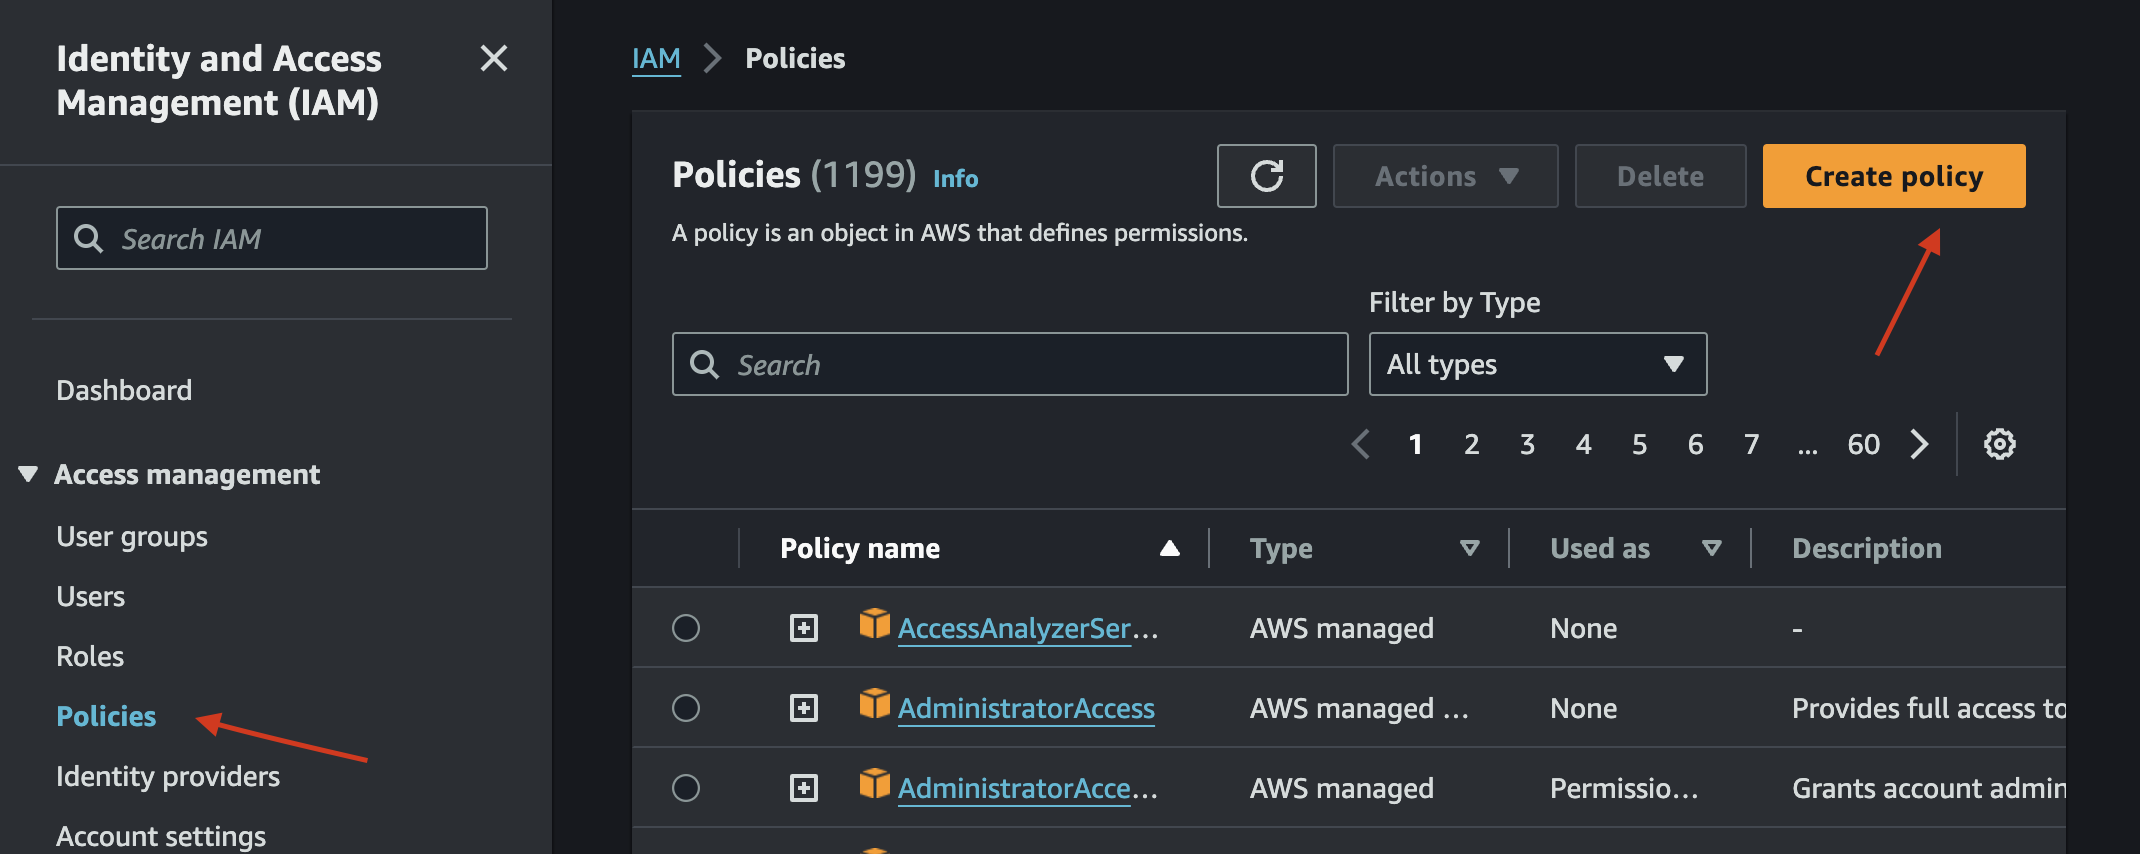
Now, make an IAM user to access Github actions. Go back to IAM and select "Policies" from the right tab and create a new policy.
Choose the JSON policy editor and add the following permissions to allow Github Actions to update ECR and App Runner:
{
    "Version": "2012-10-17",
    "Statement": [
        {
            "Sid": "VisualEditor0",
            "Effect": "Allow",
            "Action": "apprunner:*",
            "Resource": "*"
        },
        {
            "Sid": "VisualEditor1",
            "Effect": "Allow",
            "Action": [
                "iam:PassRole",
                "iam:CreateServiceLinkedRole"
            ],
            "Resource": "*"
        },
        {
            "Sid": "VisualEditor2",
            "Effect": "Allow",
            "Action": "sts:AssumeRole",
            "Resource": "YOUR-SERVICE-ROLE-ARN"
        },
        {
            "Sid": "VisualEditor3",
            "Effect": "Allow",
            "Action": [
                "ecr:GetDownloadUrlForLayer",
                "ecr:BatchGetImage",
                "ecr:BatchCheckLayerAvailability",
                "ecr:PutImage",
                "ecr:InitiateLayerUpload",
                "ecr:UploadLayerPart",
                "ecr:CompleteLayerUpload",
                "ecr:GetAuthorizationToken"
            ],
            "Resource": "*"
        }
    ]
}
Then, create a user (go to "Users" on the left hand side menu) and attach this policy as a permission. When the user is created, create an access key:
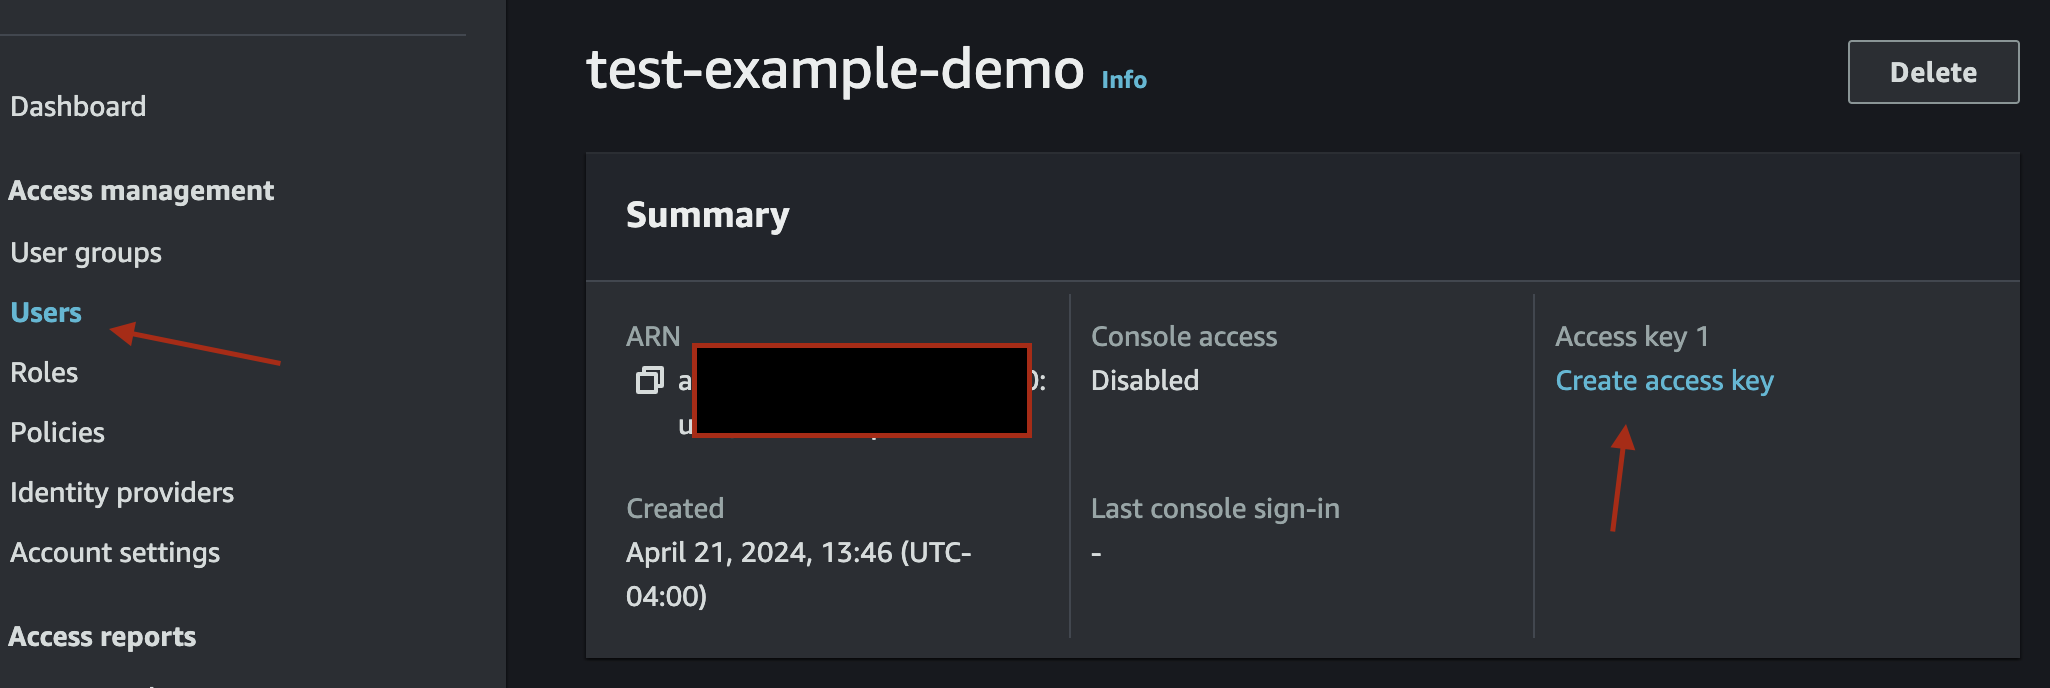
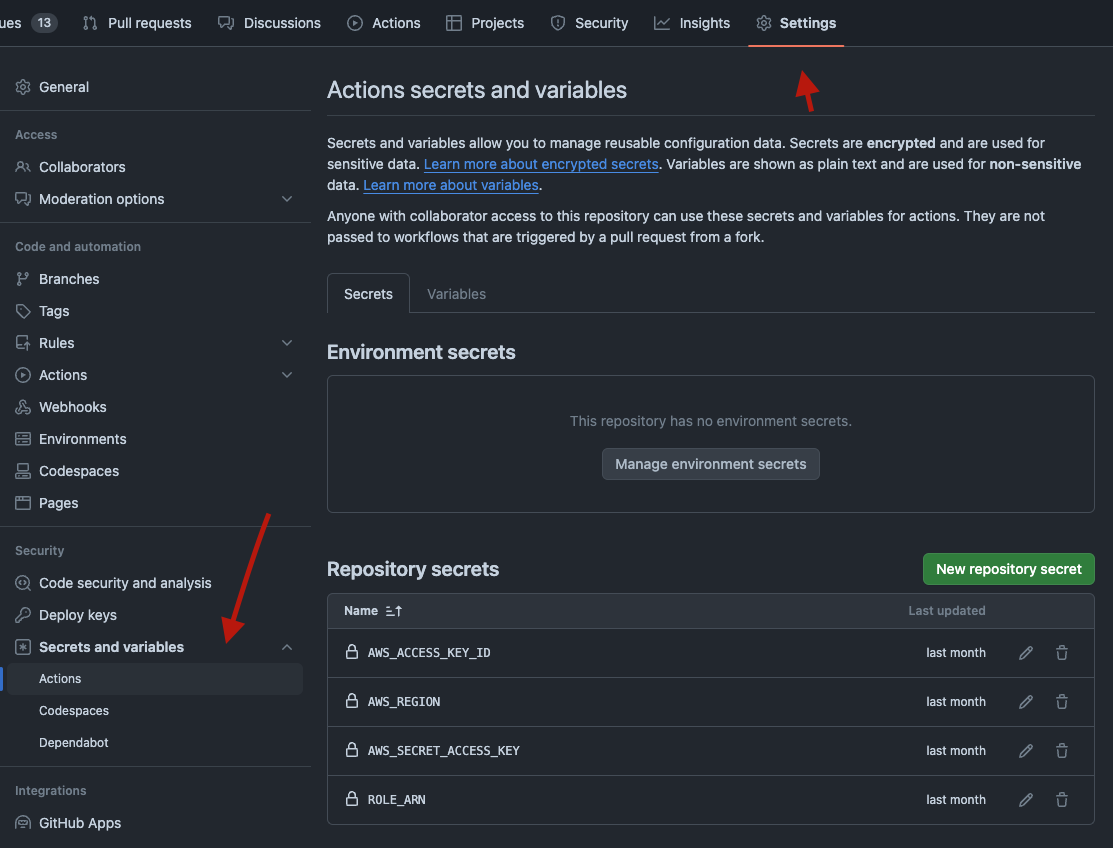
Copy both the access key and the access key secret. You may also want to store the access key in a safe password manager, since you will not be able to access it again once you have copied it. Now head over to your Github repository, and add these values. Go to Settings > Secrets and Variables > Actions, and add the following values:
AWS_ACCESS_KEY_ID- the access key of the Github user createdAWS_SECRET_ACCESS_KEY- the secret value corresponding to the above access keyAWS_REGION- the region where you will deploy your App Runner appROLE_ARN- the ARN of the role you created for accessing ECR
Adding the Pipeline
Now, let's head back into the source code. Go to your api folder and add a Dockerfile with the following content:
# Official Dart image: https://hub.docker.com/_/dart
# Specify the Dart SDK base image version using dart:<version> (ex: dart:2.17)
FROM --platform=amd64 dart:stable AS build

WORKDIR /app

# Resolve app dependencies.
COPY pubspec.* ./
COPY packages/blog_models/pubspec.* ./packages/blog_models/
COPY packages/butter_cms_client/pubspec.* ./packages/butter_cms_client/
RUN cd packages/blog_models/ && dart pub get
RUN cd packages/butter_cms_client/ && dart pub get
RUN dart pub get

# Copy app source code and AOT compile it.
COPY . .

# Generate a production build.
RUN dart pub global activate dart_frog_cli
RUN dart pub global run dart_frog_cli:dart_frog build

# Ensure packages are still up-to-date if anything has changed.
RUN dart pub get --offline
RUN dart compile exe build/bin/server.dart -o build/bin/server

# Build minimal serving image from AOT-compiled `/server` and required system
# libraries and configuration files stored in `/runtime/` from the build stage.
FROM scratch
COPY --from=build /runtime/ /
COPY --from=build /app/build/bin/server /app/bin/
# Uncomment the following line if you are serving static files.
# COPY --from=build /app/build/public /public/

# Start the server.
CMD ["/app/bin/server"]
Next, go to the root app and enter .github/workflows. Add a file titled deploy_api.yaml with the following content:
name: deploy api

concurrency:
  group: ${{ github.workflow }}-${{ github.ref }}
  cancel-in-progress: true

on:
  push:
    paths:
      - "api/**"
      - ".github/workflows/api.yaml"
      - ".github/workflows/deploy_api.yaml"
      - ".github/workflows/blog_models.yaml"
      - ".github/workflows/butter_cms_client.yaml"
    branches:
      - main
  workflow_dispatch:

jobs:
  deploy:
    runs-on: ubuntu-latest

    steps:
      - name: Checkout
        uses: actions/checkout@v4
        with:
          persist-credentials: false

      - name: Install Dart SDK
        uses: dart-lang/[email protected]

      - name: Install Dart Frog
        run: dart pub global activate dart_frog_cli

      - name: Get Dependencies
        run: |
          cd api/packages/blog_models && dart pub get
          cd ../butter_cms_client && dart pub get
          cd ../../ && dart pub get

      - name: Build API
        run: cd api && dart_frog build

      - name: Configure AWS credentials
        id: aws-credentials
        uses: aws-actions/configure-aws-credentials@v4
        with:
          aws-access-key-id: ${{ secrets.AWS_ACCESS_KEY_ID }}
          aws-secret-access-key: ${{ secrets.AWS_SECRET_ACCESS_KEY }}
          aws-region: ${{ secrets.AWS_REGION }}

      - name: Login to Amazon ECR
        id: login-ecr
        uses: aws-actions/amazon-ecr-login@v2
        with:
          mask-password: true

      - name: Build, tag, and push image to Amazon ECR
        id: build-image
        env:
          ECR_REGISTRY: ${{ steps.login-ecr.outputs.registry }}
          ECR_REPOSITORY: name-for-your-ecr-repository
          IMAGE_TAG: ${{ github.sha }}
        run: |
          cd api
          docker build -t $ECR_REGISTRY/$ECR_REPOSITORY:$IMAGE_TAG .
          docker push $ECR_REGISTRY/$ECR_REPOSITORY:$IMAGE_TAG
          echo "::set-output name=image::$ECR_REGISTRY/$ECR_REPOSITORY:$IMAGE_TAG"

      - name: Deploy to App Runner
        id: deploy-apprunner
        uses: awslabs/amazon-app-runner-deploy@main
        with:
          service: name-you-want-for-your-app-runner-service
          image: ${{ steps.build-image.outputs.image }}
          access-role-arn: ${{ secrets.ROLE_ARN }}
          runtime: NODEJS_12
          region: ${{ secrets.AWS_REGION }}
          cpu : 1
          memory : 2
          port: 8080
          wait-for-service-stability: true

      - name: App Runner output
        run: echo "App runner output ${{ steps.deploy-apprunner.outputs.service-id }}"
If everything is working, you should now have an action that triggers a deployment to app runner every time your main branch gets updated. When this workflow is committed, check the deployment in Github actions. If successful, you should have your app visible in the AWS App Runner console:

Configuring Environment Variables
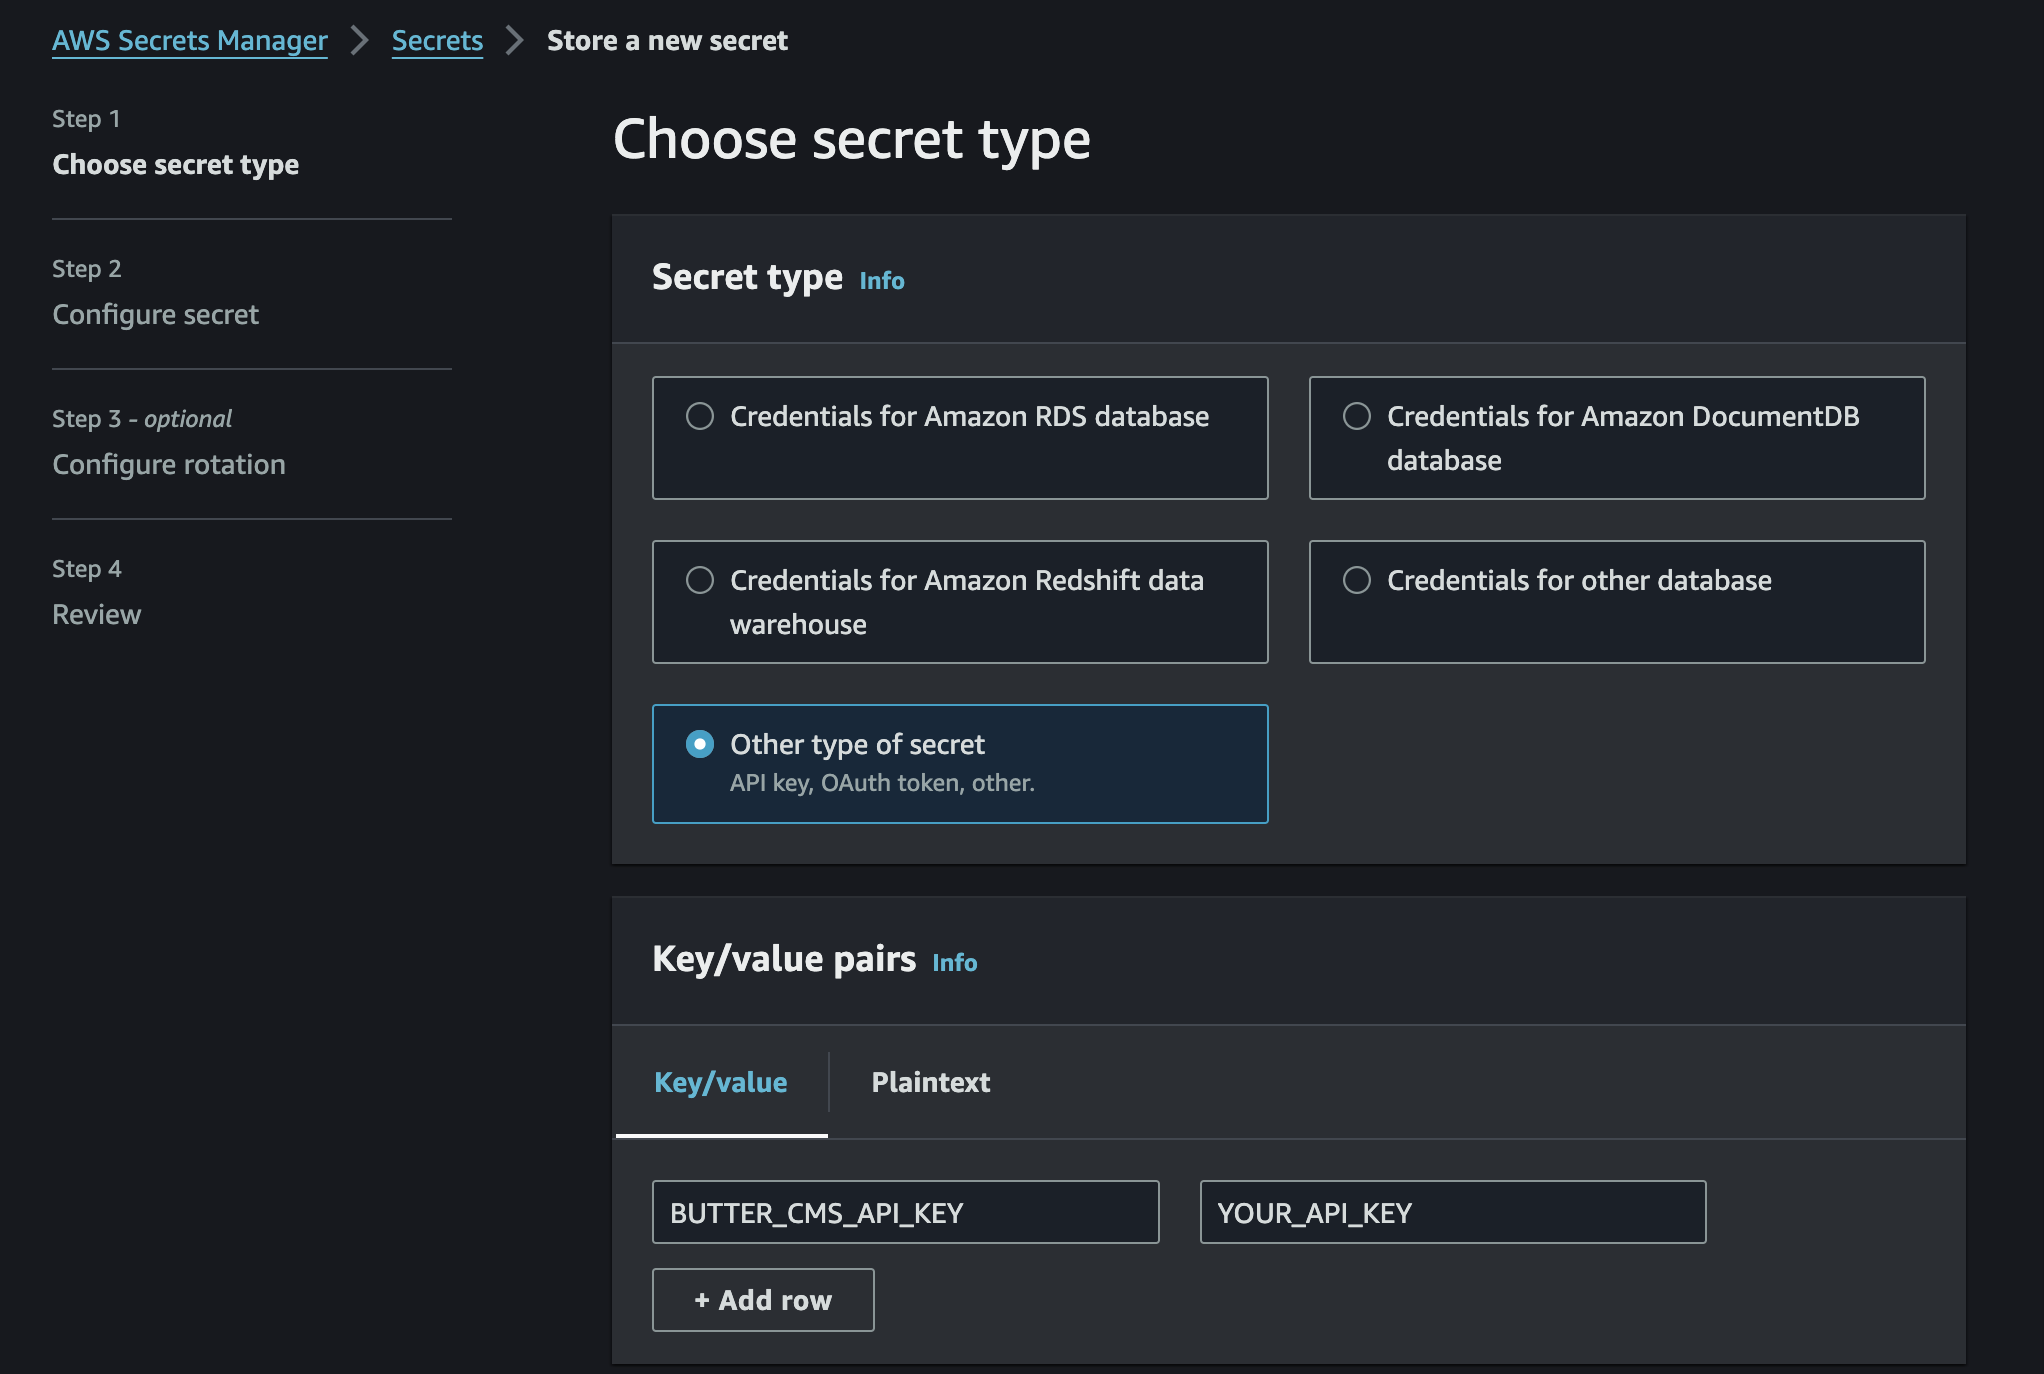
However, if you navigate to the default app URL and try to fetch content from https://your-apprunner-url/blogs, you will see an error. This is because we still need to add environment variables to App Runner. Fortunately, App Runner supports adding secret values from AWS Secrets Manager, so you can securely store your Butter API key this way. Go to Secrets Manager, click on "Store a New Secret" and add your api key:
You should now see a Secret ARN for your API key. Take note of this value, you will need it:
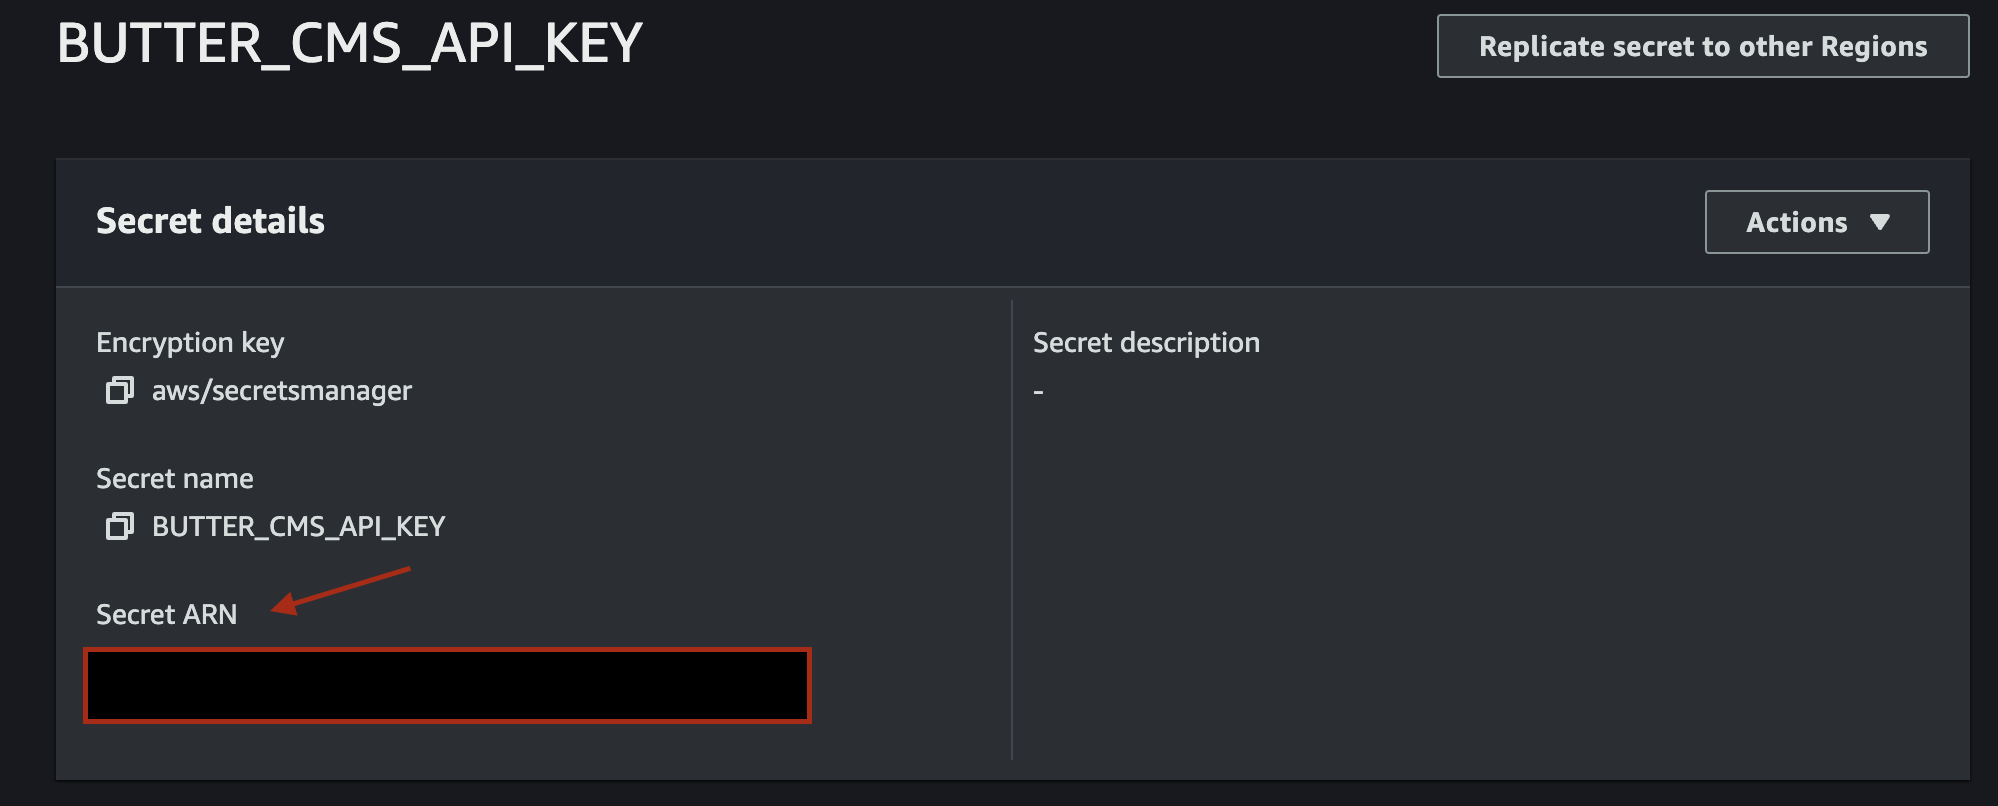
Head back to IAM and create a role to allow your App Runner app to access Secrets Manager. The role should have the following trust policy:
{
    "Version": "2012-10-17",
    "Statement": [
        {
            "Effect": "Allow",
            "Principal": {
                "Service": "tasks.apprunner.amazonaws.com"
            },
            "Action": "sts:AssumeRole"
        }
    ]
}
Add this policy to a role to grant applications who assume the role access to your API key in Secrets Manager:
{
	"Statement": [
		{
			"Action": [
				"secretsmanager:GetSecretValue"
			],
			"Effect": "Allow",
			"Resource": [
				"YOUR-SECRET-ARN"
			]
		}
	],
	"Version": "2012-10-17"
}
Now, go back to your App Runner service, select "Configuration" and click "Edit" in the top right.

Scroll down until you see a button titled "Add Environment Variable". Click on it, and then choose "Secrets Manager" as the source. Add your secret ARN under "Environment variable name." You will also need to add the role you created to allow App Runner to access Secrets Manager.
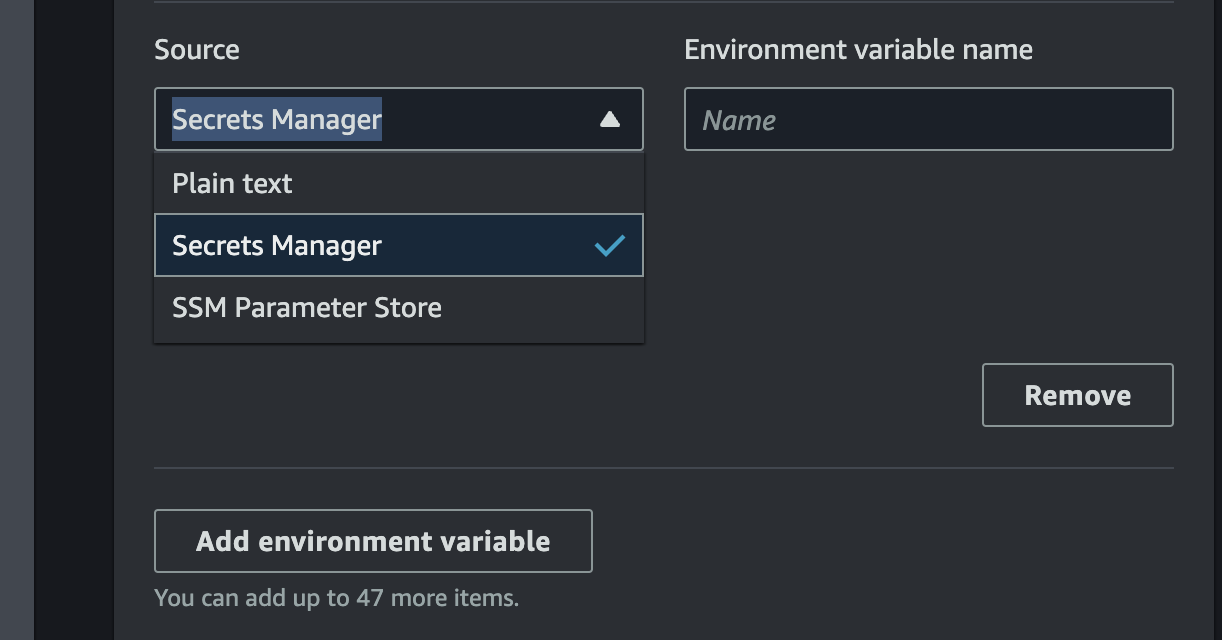
Remember to also add an environment variable titled CORS_ALLOW_ORIGIN if you are adding CORS headers. This value can be plain text, and for now it can be *.
Once your environment variables are correctly configured in App Runner, navigate in your browser to https://your-apprunner-url/blogs. You should now see the blog content that belongs to your Butter CMS account.
Deploying the App
Now that we have a successfully deployed API on App Runner, it's time to deploy a web app that fetches content from it. In this tutorial, we will host this web app using AWS Amplify, which allows us to hook our repository directly up to AWS for automatic updates when the source code changes. I recommend creating a dedicated branch titled ci for this purpose. Add build and test pipelines to protect main, and then when the main branch is updated, automate a commit to the ci branch that will push your code change. To start, go back to .github/workflows and add a file named deploy_app.yaml with the following content:
name: deploy app

concurrency:
  group: ${{ github.workflow }}-${{ github.ref }}
  cancel-in-progress: true

on:
  push:
    branches:
      - main
  workflow_dispatch:

jobs:
  deploy:
    runs-on: ubuntu-latest

    permissions:
        contents: write

    steps:
        - name: Checkout
          uses: actions/checkout@v4

        - name: Setup Flutter
          uses: subosito/flutter-action@v2
          with:
            channel: "stable"

        - name: Checkout ci branch
          uses: actions/checkout@v4
          with:
            ref: ci

        - name: Set branch to latest from main
          run: |
            git fetch origin main
            git reset --hard origin/main

        - name: Build Web Application
          run: flutter build web -t lib/main_production.dart --dart-define BASE_URL=YOUR-APP-RUNNER-URL
        - name: Copy Build Artifact
          run: |
            [[ -d artifact ]] && rm -r artifact
            mkdir artifact
            cp -R build/web artifact

        - name: Commit the Artifact
          uses: stefanzweifel/git-auto-commit-action@v5
          with:
            branch: ci
            commit_message: 'ci: automated artifact update at ${{ github.sha }}'
            push_options: '--force'
This workflow will generate a build artifact on the ci branch of your repository under the directory artifact/web. Back in the AWS Console, go to Amplify, and select "New App" > "Host Web App."
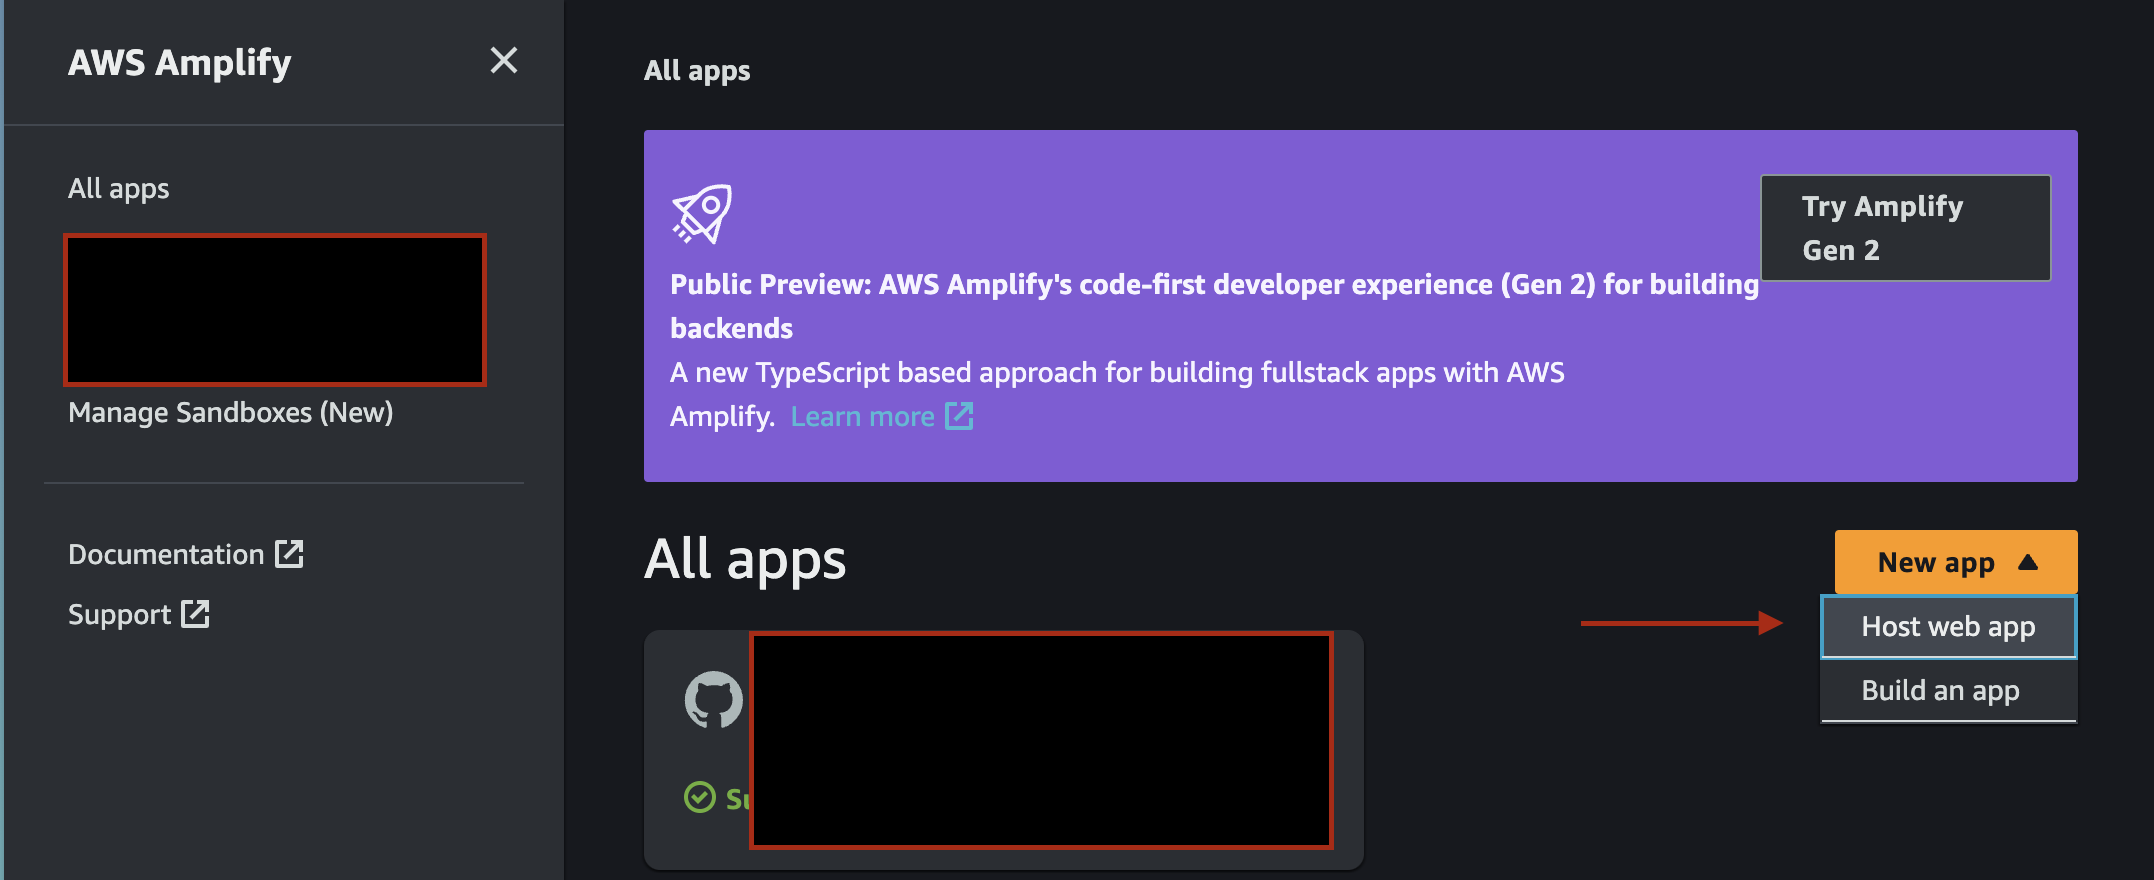
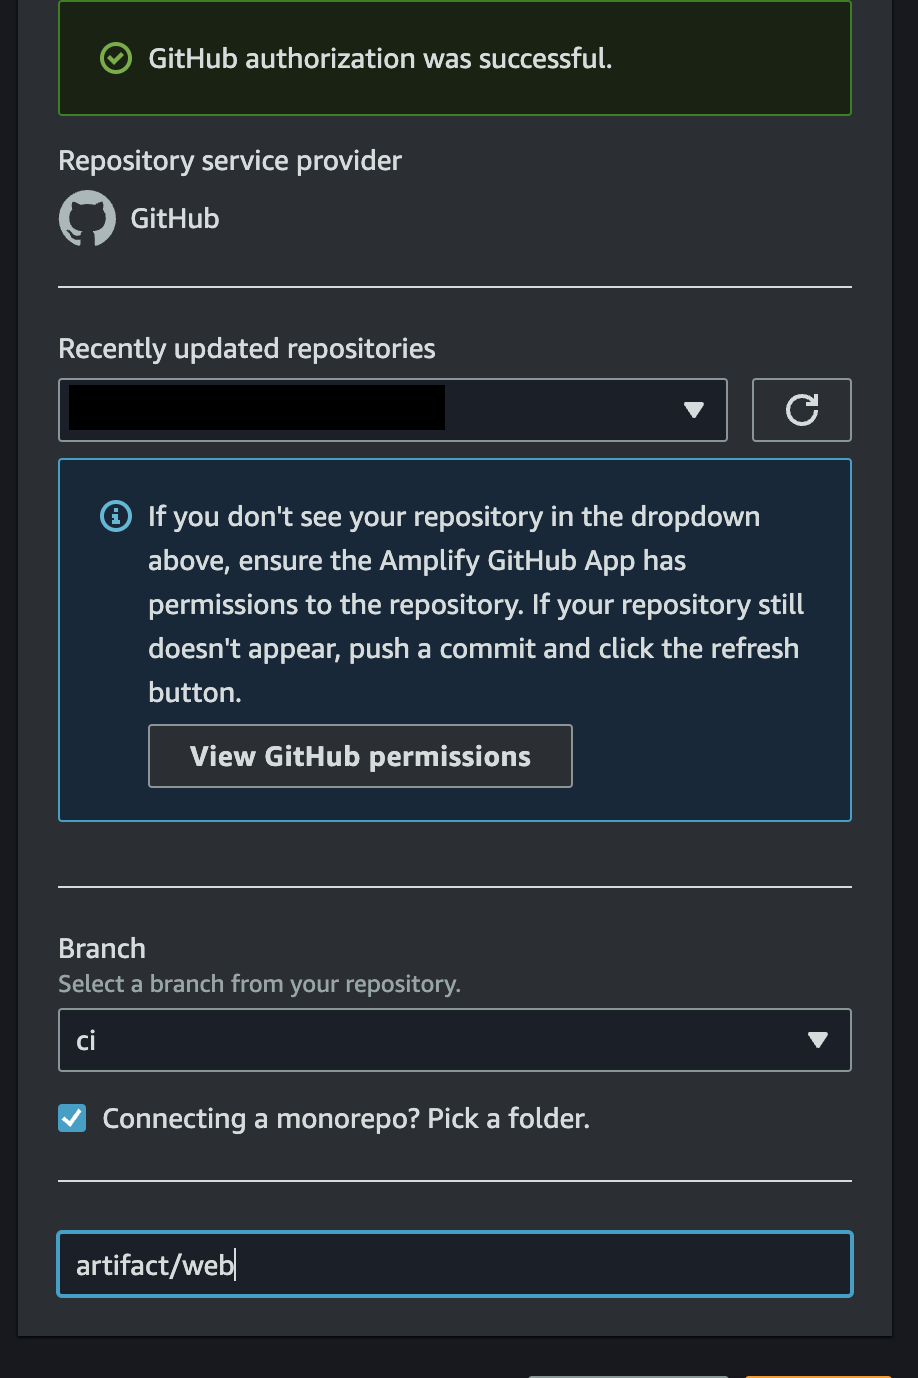
Select Github, then when you are authorized, find your repository, set the branch as ci, and check "Connecting a Monorepo?" to enter artifact/web as the directory of your build artifact.
Then continue and wait a few minutes for deployment. If everything is successful, you should see an app in Amplify that shows the content fetched from your API:
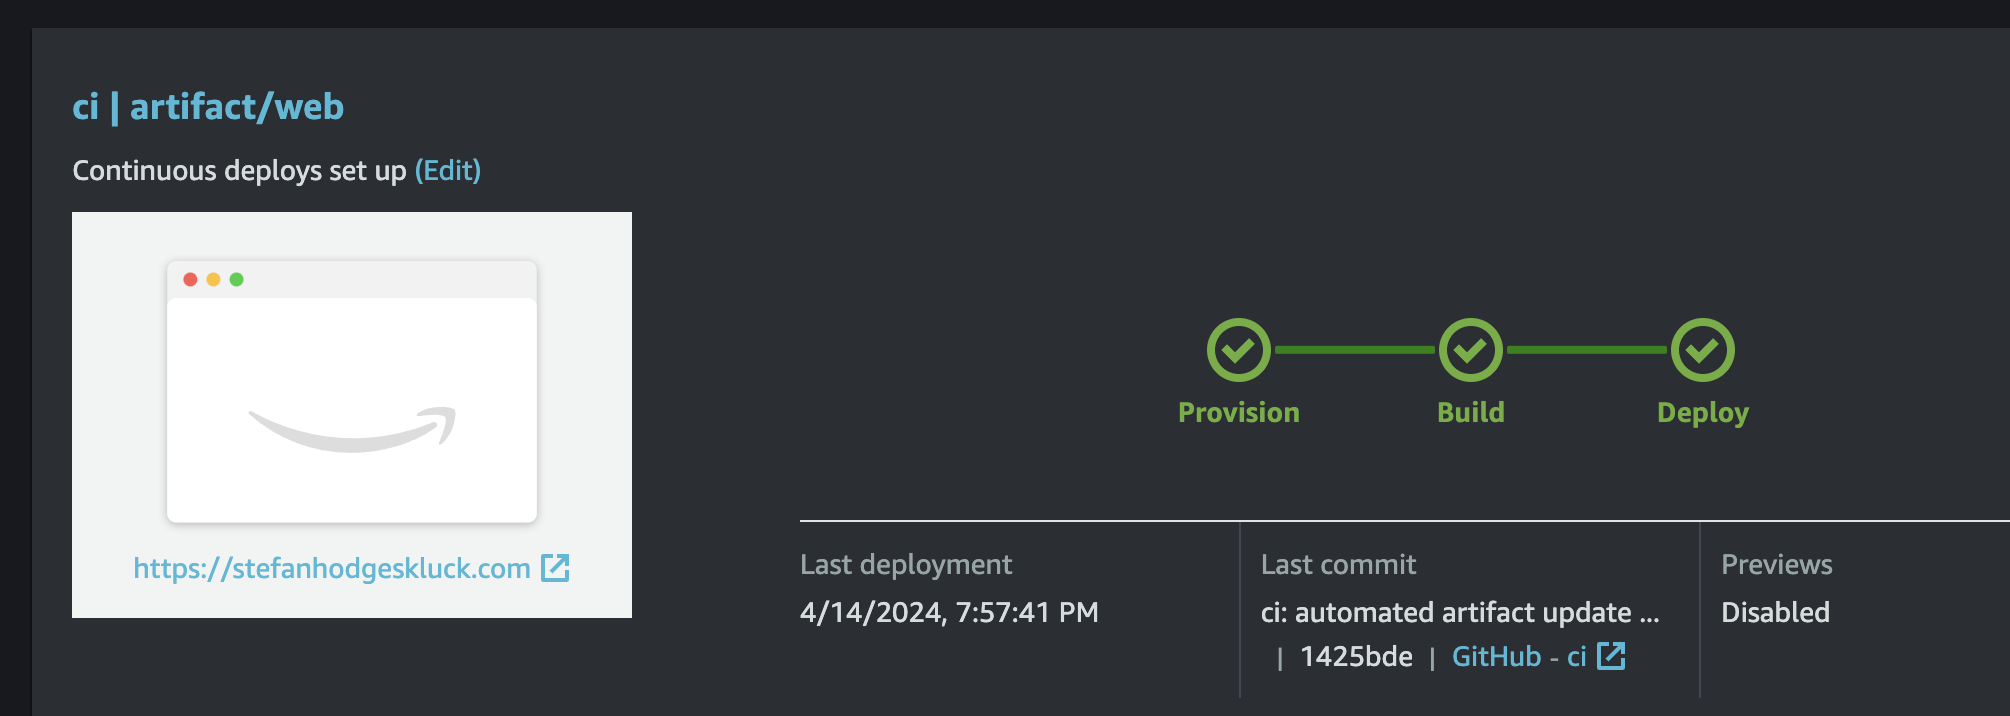
If you set up CORS, you can now set your Amplify URL to be the CORS_ALLOW_ORIGIN environment variable set up in App Runner.
If you've made it this far, congratulations! You have a full-stack blog app that fetches from Butter CMS, serves content in Dart Frog, presents content in a Flutter app, and is hooked up to be deployed on AWS. I'd love to hear your impressions on this tutorial. Feel free to reach out on LinkedIn if you have questions/comments, or if you have done similar work deploying web apps on AWS. I learned tons working on this project, and I would love to hear more about others' journeys!